Hole-by-Hole Guide
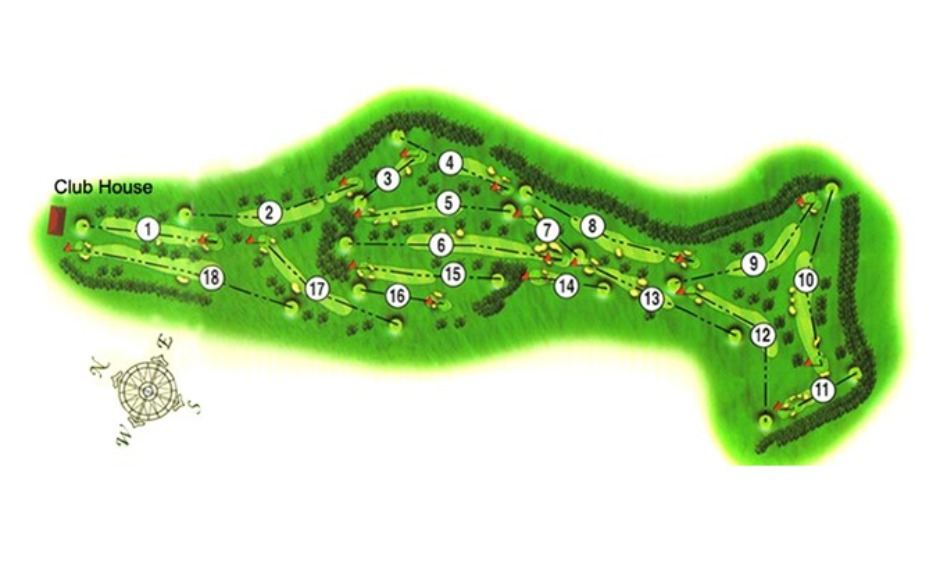
Hole-by-Hole Guide
Dunblane New Golf Club
Set in the heart of beautiful Stirlingshire, Dunblane New Golf Club may not be the longest course by today’s standards — but don’t let that fool you. With its undulating fairways, strategic bunkering, and subtle greens, it offers a true test for golfers of all abilities.
To help you make the most of your round, we’ve put together some helpful hints and pro tips for each hole. With smart course management and a little local knowledge, you’ll give yourself every chance of shooting a good score — and enjoying the journey along the way.
HOLE 1
Ochlochy
Par 4 – 325 Yards
A classic James Braid-designed opening hole that demands both accuracy and course management from the outset. Although relatively short, this par 4 is far from simple. The tee shot plays onto a fairway that slopes noticeably from left to right, making it easy for the ball to run into trouble if not carefully placed.
A well-positioned bunker on the right side punishes any drive that leaks offline, while mature trees flank both sides of the fairway, narrowing the landing area and adding further challenge. The approach shot is to a gently contoured green that is guarded by bunkers on both the left and right, with a steep drop-off to the right for any miss in that direction.
Ryan's Pro Tip: Aim to keep your tee shot up the left side of the fairway. This not only avoids the right-hand bunker but also leaves a flatter lie for your second shot, setting up a more controlled approach into the green.
HOLE 2
Gleninver
Par 4, 420 Yards
Arguably the toughest test on the course for the gents, this long par 4 requires precision and power. The fairway subtly kicks to the right, which can funnel drives into tricky lies or rough if not well-placed. The green sits on a slightly elevated plateau,adding extra challenge to the approach and often requiring one more club than the yardage suggests. The is a devil of a bunker on the right catching many an approach.
Ryan’s Pro Tip: Favour the left side off the tee to stay on the flatter part of the fairway and take enough club on your second — the uphill approach can catch players out. The smart play for shorter hitters is to play as a 5 and be happy with your bogey.
HOLE 3
Pisgah
Par 3, 190 Yards
This long par 3 often plays into a prevailing wind and demands a solid tee shot to reach the green in regulation. The hole is deceptively uphill and tends to play longer than the yardage suggests. The green itself is large and features two tiers, so distance control is crucial to avoid difficult putts or tricky two-putts. Protected by bunkers left and right creates a truly challenging par 3.
Ryan’s Pro Tip: Most of the danger lies short of the green, so take enough club — especially if the flag is on the back tier. Check the tee signage to see where the pin is positioned and swing with commitment.
HOLE 4
Woodside
Par 4, 294 Yards
A short par 4 with a big decision to make from the tee. For longer hitters, this hole is potentially drivable — but out of bounds tight to the left and bunkers protecting both sides of the green mean the aggressive play carries risk. A well-placed layup leaves a wedge to a challenging sloping putting surface.
Ryan’s Pro Tip: Unless you’re confident and have the wind in your favour, a controlled tee shot to your favourite yardage is often the smarter play. There’s plenty of reward here, but it’s easy to walk away with bogey or worse if you get greedy.
HOLE 5
Panorama
Par 4, 357 Yards
A beautiful downhill par 4 that visually invites you to open the shoulders — but don’t be lulled into a false sense of security. The rough down the right-hand side is thick and can hide wayward balls. A swale in front of the green can cause mis-hit approaches to come up short, and bunkers and trees guard both sides.
Ryan’s Pro Tip: Favour the left side off the tee for both safety and angle. Your approach needs to be well struck to fly the swale and stop on the green — better short than long, as over the back is trouble.
HOLE 6
Lang Whang
Par 5, 504 Yards
A classic par 5 that plays longer than the card indicates, with strategic challenges on every shot. The fairway tilts from left to right, which can push even solid drives into the rough. Right hand side is protected by two well-placed fairway bunkers. The second shot is blind over a ridge, and the green is protected by bunkers on both sides.
Ryan’s Pro Tip: Aim up the left to counter the slope off the tee. For your second, pick a confident line over the hill and trust your distance — a well-executed layup or third shot can set up a great birdie chance.
HOLE 7
Teezing Tap
Par 3, 162 Yards
Another strong par 3 requiring accuracy and good club selection. Trouble awaits on both sides of the elevated green, and swirling winds can make club choice tricky. The green slopes from back to front and can be quick if the pin is front. Bunker on the right hand side of the green is to be avoided at all costs.
Ryan’s Pro Tip: Take a club to get you to the middle of the green and commit to your target. Avoid the short sides — there’s very little margin for error left or right.
HOLE 8
Castle View
Par 4, 424 Yards
A tough test that requires a strong and accurate drive. The hole doglegs gently to the left. Off the tee many a drive will canter towards the right hand side fairway bunker. The green entrance is tight, guarded by bunkers, and demands a solid second shot. For shorter hitters best approach is lay your approach short and stay in control.
Ryan’s Pro Tip: Drive it down the left side to counter the natural slope and open up the angle. Don’t go flag-hunting — aim for the centre of the green and give yourself a putt.
HOLE 9
Hutcheson's Heights
Par 4, 383 Yards
This challenging dogleg demands strategy off the tee. Too far left and the trees block your approach; too far right and you risk running out of fairway. The green is elevated and guarded at the front, with bunkers both left and right, there is also a slope at the back that back of the green that can help or hinder.
Ryan’s Pro Tip: Play to the right half of the fairway for the best angle in. Choose a club that will carry the front hazards without risking going long into the banking.
HOLE 10
Wharry Glen
Par 4, 402 Yards
A scenic, downhill par 4 that offers a welcome scoring chance — if you find the fairway. Bunkers down the right hand side of the fairway are in play from both the white and yellow tees. If you hit your drive left you are blocked from approaching the green, leaving you with a chip back out onto the fairway. A tee shot down centre right opens up the best line. The redesigned green complex makes holding the putting surface a challenge, and for those shots that run through the green, a deep bunker eagerly awaits.
Ryan’s Pro Tip: Distance control on your approach is crucial. Play to the centre of the green — it’s not one to chase pins unless you’re feeling confident. A clever shot is to the top of the hill and let gravity do its work and allow the ball to roll on.
HOLE 11
Ben Ledi
Par 3, 182 Yards
The club’s signature hole and one to remember. This long par 3 plays to a narrow, 44-yard-deep green that slopes gently and is protected by multiple bunkers on the right. Out of bounds runs very close down the left, making precision off the tee absolutely essential.
Ryan’s Pro Tip: When in doubt, aim for the heart of the green. Let the contours and your putter do the rest — par is always a good result here.
HOLE 12
The Tree
Par 4, 375 Yards
This hole plays very differently from the Yellow and White tees.
White
A strong uphill hole with a dramatic dogleg left. Drives need to be long and find the centre right-hand side of the fairway to avoid the large tree that dominates the corner. The green is spacious and receptive, although protected by bunkers left and right leaving you a very narrow entrance to the putting surface.
Yellow
A completely different hole from the white tee. Aiming your drive right of "The Tree" will leave you well positioned for a simple approach to the green.
Ryan’s Pro Tip: From the white tee take a confident line just right of the tree for the best approach. The hole plays longer than it looks — trust your yardage and favour the safe side.
HOLE 13
Firs Road
Par 4, 372 Yards
One of the tougher driving holes on the course. The landing area is narrow, with a bank running across the fairway "cut to rough" land short or for big hitters getting over is a must. The second shot is to a two-tier green protected by left hand side bunker and subtle run-offs. A much more difficult hole when the flag is on the top tier. It’s a hole where both tee shot placement and precision into the green matter.
Ryan’s Pro Tip: Focus on a straight drive to the middle of the fairway. Take an extra moment to assess the pin location — hitting the wrong tier can easily lead to a three-putt.
HOLE 14
Wilson's Alley
Par 3, 161 Yards
A stunning short hole with panoramic views of the surrounding hills. The green is large and flat, but anything short and left brings a deep pot bunker or potential OB into play, the bunker to the right of the green is no picnic either. A great birdie opportunity — if you hit the right spot. A good miss is the to the right, leaving you either an easy chip or putt onto the green..
Ryan’s Pro Tip: Club selection is everything here. Play to the middle of the green and enjoy the views — a good tee shot will be rewarded.
HOLE 15
St. Blane's
Par 4, 322 Yards
Take a second or two to enjoy the far reaching views. The hole is a short, tactical par 4 where risk and reward are balanced. The fairway slopes severely right to left and can feed balls into awkward lies, or behind trees. The green is drivable, but a miss left leaves a tricky chip back uphill. Protected by 2 bunkers at the front of the green and one at the rear - your approach has to be precise.
Ryan’s Pro Tip: Play to the 80–100 yard range unless you're feeling bold. If you do go for it, commit fully — and don’t miss left.
HOLE 16
The Quarry
Par 3, 194 Yards
The final par 3 is a strong one ( A true card wrecker). Anything right of the green leaves a daunting recovery. While hitting left can feed back into the green if you avoid the cunningly positioned bunker. Hitting the green is the best option, but by no means an easy one.
Ryan’s Pro Tip: Use the left banking to your advantage. Better to be long-left than short-right — the green is generous if approached from the correct angle.
HOLE 17
Dam Road
Par 4, 363 Yards
A blind tee shot over a hill opens up to a fairway sloping right to left. A solid drive leaves a straightforward approach to one of the more inviting greens on the course — drives that don't make it over the hill can take a 90 degree bounce left into trouble leaving a very unattractive approach. From the tee you really need to go for it.
Ryan’s Pro Tip: Pick a committed line off the tee — aiming slightly right — and trust your swing. Find the fairway and a good score is there for the taking.
HOLE 18
The Murray's Hame
Par 5, 491 Yards
A picturesque finishing hole and a favourite amongst members and visitors alike. Keep your drive centre right off the tee as fairway generally takes the ball left, where a well within range bunker is waiting for you. Long hitters can go for the green that is protected left and right by bunkers. Those who lay up need to aim for the centre of the fairway leaving a straight forward chip onto the green. Any second shot that lands left may be blocked out by the trees.
Ryan’s Pro Tip: Play smart — keep your ball right off the tee and again on your approach. It’s a real birdie chance to close your round on a high note.